
Virtually all collectors and repairers of vintage pens are familiar with Sheaffer’s great plunger-filling pens of the ‘30s and ‘40s. But the average U.S.-centric collector may not know that Sheaffer didn’t invent plunger fillers. Without going into excruciating detail, I’ll point out that the original plunger filler came from England. Invented by a mechanical engineer, tinkerer, and sometime vaudeville performer named George Sweetser, it came rolling out of Thomas De La Rue & Company’s factory in 1906, and it looked like this:

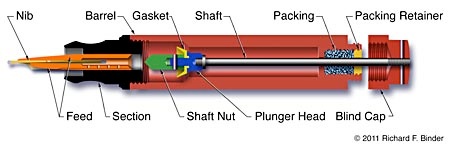
I restored the filler in one of these recently, and just for grins I took photos so I could write a step-by-step procedure. This will either scare you off or help you to learn how to do these pens yourself. Are you ready for this? Okay, let’s go. First, here is a cross-sectional drawing of the pen to show you the layout of the components.
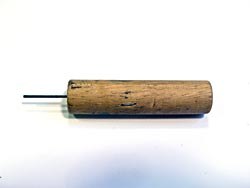
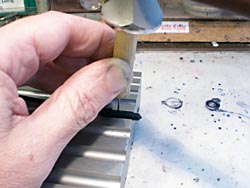
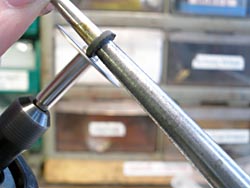
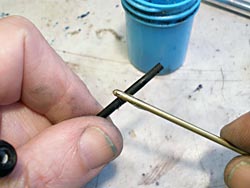
You will need a punch for driving out two small hard rubber pins in the pen. The first photo here shows mine, which I made from a 2" length of 1/2" hardwood dowel and a couple of pieces of stainless steel music wire. One piece, made of 0.039" wire with its end nicely flat and perpendicular to the wire’s axis, is the punch. That piece I drove into a same-sized hole drilled into the end of the dowel. Do this on a lathe; there’s no way you can hold things straight enough by hand. The other piece is 0.032" wire, and it goes through a same-size hole drilled laterally through the dowel to serve as a backstop for the punch. The wire’s exposed end is then formed into a square U shape and pounded the rest of the way into the dowel to keep it in place. The last exposed end is ground off flush with a Dremel grinder.
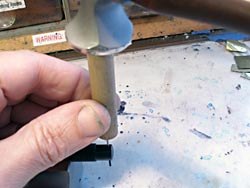
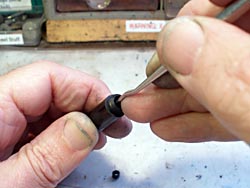
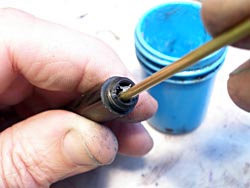
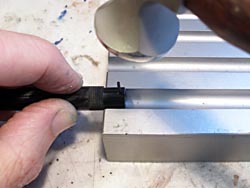
I use a jeweler’s forming block as a steady rest when I’m knocking pins out of pens; the righthand picture above shows the process for the pin that passes through the blind cap to secure the plunger shaft. The first thing you have to do is to find the exposed ends of the pin. It’s made of hard rubber, just like the blind cap, and the exterior surface of the blind cap was finished after the pin was driven through — this can make it difficult to find the pin. Look hard enough, however, and you’ll eventually find it. You can see from the photo here and from the cutaway drawing above that the pin goes through the blind cap very near the distal end of the blind cap; knowing this will help you to find the pin.
Once you’ve found the pin, lay the pen barrel into a groove in the forming block or, if you don’t have a forming block, on a flat surface such as the top of a wood block cut from a 1×4. Use blue painter’s tape to tale the barrel down securely with the blind cap hanging a little over the edge, as in the photo. As you’re taping the pen down, orient it so that the pin through the blind cap is aligned vertically so that you can drive it out. Line up your small punch with the end of the pin, and tap with a jeweler’s hammer. Check to see if the pin has moved, and repeat the careful taps until it does move. Then you can drive it out.
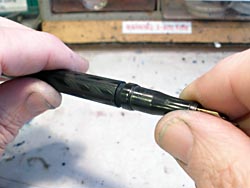
With the pin out, unscrew the blind cap from the barrel and then unscrew it from the plunger shaft. Note that the blind cap screws onto the shaft with a left-hand thread. Turn the blind cap clockwise to unscrew it! You might need to use a little heat to get the blind cap to move, but once it is loose, it will screw off easily.
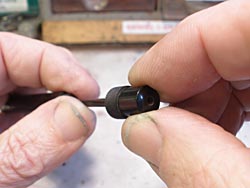
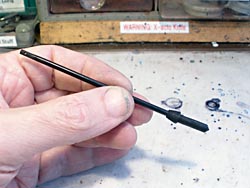
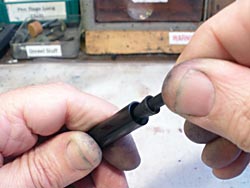
Unscrew the section from the barrel. This joint is right-hand threaded; unscrew it in the usual way, by turning counterclockwise. Now you should be able to push the plunger shaft out of the barrel from the rear, using a length of coat hanger wire or a similar tool. The right photo below shows the plunger after it has been removed; the bulbous end was toward the nib.
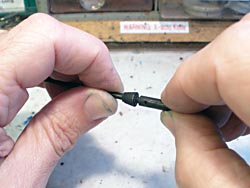
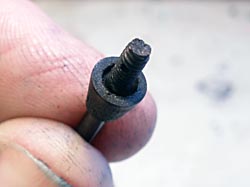
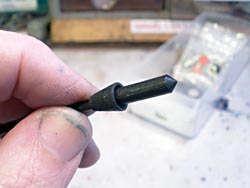
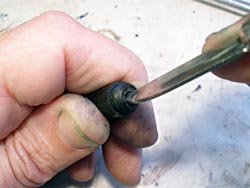
The cone-shaped part near the end of the shaft is labeled Plunger Head in the cutaway drawing. As the drawing shows, it can be removed from the shaft — but there is no need to take it off, and it’s always better not to take something apart unless you must do so. Instead, we will remove only the long skinny thing at the very front of the shaft (the green part labeled Shaft Nut in the cutaway drawing above). Like the blind cap at the other end of the shaft, this part is secured by a small hard rubber pin. Locate the pin and drive it out with the special punch (below, left). Then you can remove the shaft nut from the shaft (below right). Some pens have a plain unthreaded shaft, but most have a threaded shaft (left-hand thread).
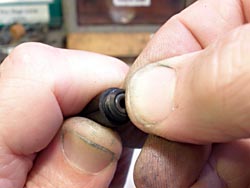
With the shaft nut removed, look for a groove in the end of the plunger head (below). Early models like the one being repaired in this article will have this groove, but some later Onoto pens have a washer here instead. The washer has an inside diameter large enough to leave the required space.
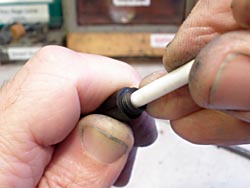
Install a new cup-shaped plunger gasket onto the end of the shaft, making sure that the boss at the gasket’s smaller end fits into the plunger-head groove (or between the washer and the shaft), and then reinstall the shaft nut. Line up the holes in the nut and the shaft, and reinstall the small hard rubber pin. Be careful here; if you do not have the holes lined up perfectly, you can break the pin, the shaft, or the shaft nut. When you have finished this assembly, it should look like the photo below.
With the shaft ready to reinstall into the pen, we turn to the packing at the distal end of the barrel. First, you must remove the threaded hard rubber ring that secures the packing in place. There is no slot or other ready means provided to unscrew the ring; I’ve found that a triangular rat-tail file will serve perfectly as a removal tool. Insert the pointed end of the file into the ring and slip the file in until it sticks. Then you can unscrew the ring. It has a right-hand thread. The photo below shows the ring removal operation.

Now use an appropriate dental probe to pick out the cork (below).
We will replace the cork with a Viton® O-ring, size 2-006, which will give better performance and longer life (and will not shrink and dry out if the pen is left empty). The catch is that the outside diameter of the O-ring is just a little too large. We need to trim the O-ring to make it fit into the pen. To do this, I slide the O-ring onto a jeweler’s ring mandrel to hold it and then turn it down by grinding it carefully against a diamond wheel on a Dremel tool (below). Other methods will certainly work; the object is to end up with an O-ring that will just, with a little encouragement, fit into the pocket at the back of the barrel.
With the O-ring ready for installation, apply silicone grease fairly liberally around the inside of the pocket, avoiding the threaded area near the opening, where the hard rubber ring will go back in. The photo below shows this step; I’m using a length of 5/64” brass rod with its shaped to a hemisphere and polished smooth.
Insert the O-ring and use the handle of a single-ended dental probe, or a similar tool, to seat it all the way into the pocket (next two photos).
Cut a 5/32” length of 3/16” rigid styrene tubing (available on the Web or at hobby shops that cater to model railroaders). Deburr its ends, and insert it into the pocket on top of the O-ring (photos below). The O-ring does not occupy as much space as the original cork, and this tubing is a spacer to take up the rest of the space in the pocket so that the O-ring will not slip back and forth, risking a failure of the seal.
Now reinstall the hard rubber retaining ring. You cannot use the rat-tail file for this job because it will catch on the plastic tubing. Instead, use a knife as shown in the following photograph. The knife being used here is a jeweler’s bench knife with a sheep’s-foot blade; this provides a wide enough shape that the knife won’t strike the plastic tubing. Tighten the ring down just enough to keep it secure; overtightening it will squeeze the O-ring and make installation of the shaft more difficult — and will also make the filling action stiffer. If the action is too stiff, the user can bend or even break the shaft.
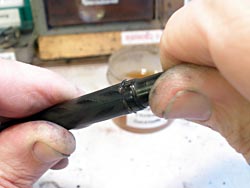
Apply silicone grease to the end of the shaft adjacent to, but not on, the threads. See the left photo below. Then slip the shaft, threaded end first, into the pen from the front. Find the opening in the O-ring by feel, and then screw the shaft (left-hand thread) into and through the O-ring (right photo).
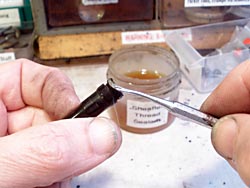
Apply a rosin-based nonhardening thread sealant on the section’s threads, and screw the section tightly back into the barrel (photos below).
Clean off any sealant that comes oozing out of the joint as you tighten it. You can use heat, very sparingly, to soften the sealant and then clean it off with a cotton flannel rag.
The final step is to reinstall the blind cap (left-hand thread). Line up the holes in the blind cap and the shaft, and and stake the blind cap in place by reinserting the hard rubber pin. The pin is very delicate! Be sure you have the holes properly aligned; you can see light through them when they’re half a turn out of line, and if this is the case when you drive the pin in, you will break the pin. You can use your special punch to verify the alignment; if the punch will not go through the hole, figure out why and correct the problem.
When you install the pin, try to put it back in an orientation that matches the original as closely as possible. Frequently, Onoto will have imprinted a model number on the blind cap in such a way that the imprint overlaps one end of the pin. You can use the fragment of imprint that is on the end of the pin as an indication of how the pin should be positioned. The left photo here shows the pin being inserted, and the right photo shows how to reseat it into its original position. Tap gently! Ten gentle taps are much better than one hard tap that breaks the pin.

With the pin in position, heat the areas of the blind cap near the ends of the pin a little. This will soften the pin and allow its ends to resume the dent-free shape they had before you drove the pin out. The final step is to sand the ends of the pin very lightly to blend them in with the surface of the blind cap, and polish the sanded area with a little Simichrome on a cotton flannel rag. Be sure to clean off the Simichrome completely when you’ve finished polishing.
There now, that wasn’t so bad, was it?


